
Maybe you’ve decided that it’s time to start getting stronger and in better shape. You’ve probably decided that push-ups are a good starting point – and you’re right! A lot of beginners, or people who haven’t done push-ups in quite a while, will have a problem with uneven push-ups. So, how do you fix these imbalances in your push-ups?
So you start doing push-ups, but find that your form is uneven. One side lags behind the other, or you can’t keep your shoulders parallel to the ground. You have a weak area in the chain. Push-ups are a compound exercise, that is, they involve more than one joint. So you need to figure out where your weak point is, and train to correct it. Uneven push-ups can be corrected by doing a number of things, including smaller sets, or partial (range) reps, amongst others that we will discuss.
The point is that this is a problem that can be addressed. For the amount of time you need to put in, there are few exercises that will give you so much in the way of results with so much simplicity and convenience.
Once you get your push-ups perfected, you’ll be able to get really good at them and be on your way to an amazing physique. So, let’s look at how to correct uneven push-ups.
Why your push ups are uneven.
The short answer is you have a weak point. For most people the weak point will be the triceps or shoulder, as opposed to the chest.
Usually, a beginning trainee will pull to one side or the other, as most people have a dominant side. That is to say, that if you are right handed, your left side May lag behind on the way up when doing push ups. In extreme cases, the untrained (or under-trained) arm may cause you not to be able to do push-ups at all.
You may not have a weak point at all, you may just need to adjust your technique.
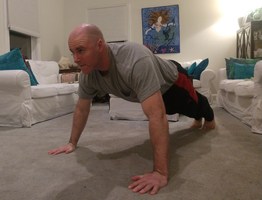
What does a correct push-up look like?
While there are countless variations, a basic push-up involves a shoulder width, or slightly wider hand position with fingers facing the same direction as your head.
Maintain a rigid body with an imaginary straight line running from your heels to your head.
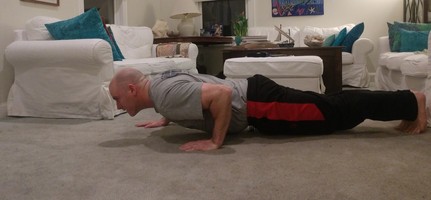
Lower yourself as close to the ground as is comfortable on your shoulders. This doesn’t have to be all the way to where your chest touches the floor, but make sure your elbows are bending to a 90° angle or less.
Press your weight back up until your arms are extended. Repeat.
Don’t go too fast, unless you are attempting to get as many as possible in a given time frame, but based on the subject of this post, you’re probably a beginner, so focus on good form and take 1 second to descend and 0.5-1 seconds to push up.
Locating and training weak points.
First let’s take a look at which body parts and muscles are used when doing a push-up.
Joints involved: shoulders, elbows, wrists.
Muscles directly involved: pecs (chest), triceps (back of upper arms), front deltoids (shoulders).
Muscles indirectly involved: lats (outer back), biceps, core, legs.
Pay attention while you do a set of push-ups. Have an honest and attentive friend critique your form. Where are you having difficulty? Where is the sticking point? Is one arm noticeably stronger than the other?
It’s helpful to take a video of yourself doing some push-ups so you can see yourself better and accurately assess where you’re struggling.
For some trainees, the problem is that they lack the strength to hold their body rigid. In this case, some core exercises like planks, and crunches, would be of great help, along with toe touches and good mornings to strengthen the lower back. These will help you midsection grow stronger and allow you to have better form when you attempt push-ups.
How do you correct a pushup?
Step 1 – Negatives.
If you cannot do complete push-ups with good form, start with negative repetitions. If you’re not familiar with the terminology, a “negative rep” simply means the downward half of the movement.
Get in the starting position to do a push-up, (at the top of the push-up with your arms extended). Slowly lower yourself to the bottom of the movement. Place your knees on the ground and get back in starting position – without attempting to press yourself up. Repeat for a set of 5-10 or as many as you can handle. Do three to four sets.
It is very important that you lower yourself as slowly as possible, maintaining complete control of your body movement throughout.
When I say slowly, I mean you want to take two to three seconds to lower yourself down. This will be challenging, and if you cannot do that slowly, just did the negative as slowly as you can. If you can do it even slower, like over the course of 5 seconds, then you should not be having any problems doing push ups as you’re already quite strong. The point is that you are controlling your weight and not losing the battle to gravity.
Step 2 – Partial Reps
This is a really important intermediate step. For most people, the weakest point in the movement will be at the bottom. The next step will be to lower yourself down and do a partial press to the top.
So, stack something underneath your chest. This could be a large pillow, an aerobics step, blocks, books, whatever you have. It doesn’t have to hold your weight – you’re not going to be laying on it – you just need something that will let you know when you’ve gone low enough.
Start with something about 12″ high, like 2 shoe boxes or a milk crate, and do partial reps where you only descend until your chest touches it then you press up forcefully.
As you get stronger, you can lower the box under your chest and gradually increase to the full range of motion as you improve and grow more confident.
Once you master the negatives, partial range reps are really the thing that will get you to where you can do push-ups correctly without being uneven.
Step 3 – Full Range Push-Ups.
Once you are doing close to a full range push up, go ahead and go for it. But keep the sets short. Perform sets of 3-5 push-ups while keeping absolutely perfect form.
If you cannot maintain correct form for this number of repetitions, drop down two sets of one or two. Whatever you can handle correctly. Aim to get at least 25 push-ups per workout, so if you’re doing sets of one or two push-ups, obviously this will be quite a few sets. Don’t worry oh, you’ll get better at them!
Step 4 – Staggered or One-Arm-Elevated Push-Ups
Once you get to the point where you can do perfectly even push ups and you have eradicated your imbalances, where do you go from there? You should always be striving to improve, but how should you go about that?
Your next goal could be to make your “weak” strong enough to be your dominant side. Imagine if your left side could do anything that you’re right so I could do this!
You want to be where your weaker side can do the majority of the work if needed. Your balance is something that can also be improved.
This is where the staggered push-up or one-arm-elevated push-ups will come in.
What is a staggered push up?
A staggered push-up is performed with your hands not in side-by-side position on the ground. The hands will still be position out to the sides, but one hand will be further forward than the other.
This will work your muscles in a way that will never push ups will not. It will be like doing two push-up variations at the same time and your body will have to work overtime to compensate. Also the uneven hand positioning will improve your balance and coordination, allowing you to develop real-world strength.
These can be a little tough on the shoulders so of course, do not continue if you experience any discomfort.
One-Hand-Elevated push-ups.
Another really great, yet unusual, variation on a standard push-up is what I call the one-hand-elevated push-up. Or you could call them unilaterally raised push-ups…
The name is not important! What’s important is how you implement and perform them. Simply get a block or brick and put it under one hand, so that one of your hands is 2-6″ higher than the other. The hand positioning is even on both sides but one hand is elevated.
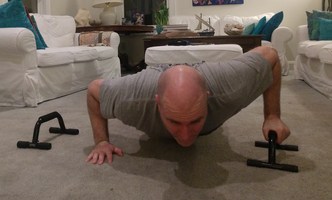
You could use some books, or put one hand on an aerobics step. Or, if you use push-up handles, just use one.
What the one-hand-elevated push-up does, is it mismatches the strongest range of movement between your arms. So while one hand is working within its power zone – where it is strongest, at the top of the movement, the other hand is working hard within a weaker, lower part of the movement.
This variation really will unilaterally work all the muscles involved in push-ups, and will help you break through any plateaus and correct any of balances – and then some!
Start with a small difference in height between your right and left. Then gradually increase the height of the elevated hand from 2 to 6″. Be sure to train both sides equally so as to keep things even and balanced.
Here’s a chart explaining what to do to correct uneven push-ups:
| Exercise | Negatives | Partial Reps | Full Range Push-Ups | Staggered/Uneven |
| How Many | 2 x 10-15, 5 days a week | 2 x 20, 5 days a week | 2 x Failure, 5 days a week | 1 x Failure, per arm |
| Duration | 1-2 weeks | 1-2 weeks | Forever | As Needed |
Should I use weights to fix my push-ups?
If you have access to a gym, or weights, it may well be beneficial for you to use them. Dumbbell training in particular is really helpful for smoothing out imbalances between the same muscles on different sides. When you use a barbell, the stronger side may compensate for the weaker side – but when you use dumbbells, each hand is forced to work independently.
Try doing some high-rep sets of dumbbell bench presses, incline presses, and/or overhead presses to eliminate weak points and imbalances. Stick with sets of 15-20 reps and use a light enough weight to where you don’t quite reach failure.
Should elbows be tucked in for push ups?
While there are countless variations of push-ups, typically your want to keep your elbows close to your body. When the elbows flare out too much to the sides, it puts unnecessary strain your shoulders and can definitely lead to problems down the road.
You’ll find that you’re actually much stronger with the elbows tucked in, and can do more repetitions. Just like with the bench press, if you are accustomed to doing the wide hand stance, you may feel a little weaker when performing the exercise with a narrower hand stance. However this perceived weakness will quickly subside and you’ll be stronger than ever on this movement.
Often people do wide-spaced push ups as a way to concentrate on their pecs. Wide angle push-ups will isolate the chest muscles better so it’s okay to throw in a few, here and there. But for the most part you need to keep your elbows close to your sides and pay attention to your joints.
What type of push-ups should I do?
Push-ups can be modified in countless ways, with endless variations to emphasize a certain muscle group or range of motion.
Not only can the width of your hand placement, and how far forward or back your hands are placed affects the target and difficulty of your push-ups, but even simply adjusting the angle at which you hands are positioned in each of those hand spacings will also make the exercise quite different.
But to start, you should master a basic push-up where your hands are slightly wider than shoulder-width apart, with your fingers pointing in the same direction as you head, and with your elbows staying close to the body at the bottom of the movement.
These standard push-ups will develop the chest, shoulders and arms, and strengthen the upper back, core and hips. The whole body will learn to act as a single unit and remain board-like and rigid.
| Variation (Hand Placement) | Wide | Shoulder-Width | Narrow | On handles |
| Muscles emphasized | Chest | Chest, Shoulders | Triceps | Chest Shoulders |
Why bother correcting your push-ups?
Push-ups are definitely one of the most convenient and effective exercises out there. Not only do they require zero equipment and cost zero money, they’re one of the best upper-body strengtheners and mass-builders that you can do. So why not get the most out of you push-ups!?
Without correcting your push-ups your weak points will remain weak, and possibly get worse, leading to increased risk of injury and imbalance in your body mechanics and physique. You’ll also certainly be robbing yourself of most of the benefits of push-ups.
So get it right now, correct your imbalances! Start out right and build yourself from there. Soon you’ll be cranking out perfect push-ups every day and moving on towards achieving your fitness goals.
Related posts:
What’s the best way to do 200 push-ups?
I call it PPM (Push-ups per minute). Place a clock or timer near you. You could watch a movie or TV show and have the timer running. Listen to music, whatever. Every minute, on the minute, do 10 push-ups as fast as you can, then rest and stretch for the rest of the minute. Continue this for 20 minutes. You will notice that at first this is really easy, but once you’ve got a few sets under your belt, it’ll start to take a little bit longer. As the sets take longer, your rest periods become shorter, providing less recuperation for the following set. Your heart rate will be elevated for the entire 20 minutes, and for a few minutes afterwards. Providing a workout with a steadily increasing difficulty from warm up to final set.
Push-ups and sit-ups are not cardio. Here’s why.
Push-ups and sit-ups, or crunches, will certainly elevate your heart rate, but are anaerobic, or muscle strengthening in nature. They are not aerobic, or cardiovascular. They are generally performed in sets, not non-stop for 20+ mins as this is impractical because they use your muscles’ cells immediate energy source, ATP, which is used up very quickly and needs a few minutes to refill. So while push-ups and sit-ups will have many benefits, they will not burn as many calories or have the same heart and lung benefits as cardio.
